Timesheet
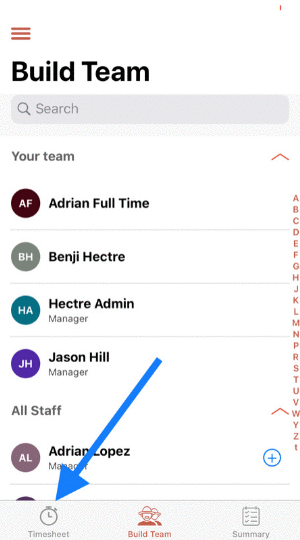
Build your team of workers
Step 1: Click on the hamburger symbol at the top left corner to access the menu.
Step 2: Select Timesheet
Step 3: Select ‘Build Team’ at the bottom of the screen.
Step 4: Click on the + sign next to the names that you want to add to your team.
Step 5: To remove/delete a worker, simply swipe left on the name and click on delete.

Assign a job to these workers
Once you’ve built your team, follow these steps to give them a job.
Step1: Navigate to Timesheet at the bottom tab
Step 2: Select the picker you want to assign a job to. You will see a tick mark upon selection.
Step 3: Click the + button at the top right corner of the screen
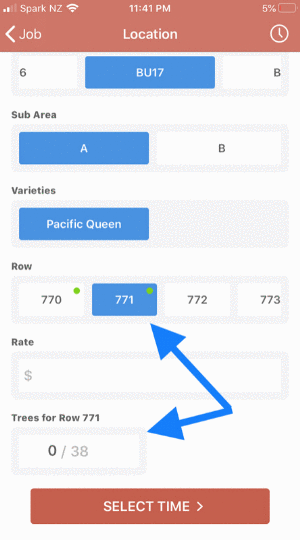
Step 4: Select a job. Say, Spraying. (this is just an example). You will now have to select the Orchard, the Block, and the Sub Area. Upon selection, you will see rows, and each row selected shows the number of trees in each row.
Note:
The green colour on the rows indicates that the row has already been pruned as well as the number of trees.
The orange colour indicates that the row has been partially pruned. It also shows the remaining trees.
Assign a row
Once you’ve selected a picker and assigned a job, assign a row for them to work on.
Step 5: Select the row you want to assign this particular picker to.
It automatically shows you how many trees have been pruned and how many are left. This keeps you from overpaying, or ghost trees appearing
Step 6: Calculate the rate per tree.
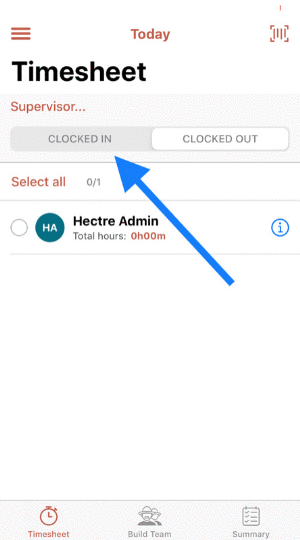
Step 7: Assign a start time for this worker and click on ‘CLOCK IN’ at the bottom of the screen.
Success! You have clocked in the selected picker.
Track what your pickers are working on
Once you have successfully clocked-in a picker, follow these steps to track what they are working on.
Step 1: Navigate to ‘CLOCKED IN’. You should see the pickers that you have clocked in, and the job each person is doing below their name.
Step 2: Click on the info button, denoted by ‘i’ to the right of the names to open up their work details for the day.
Give everyone a lunch break
Navigate back to the ‘CLOCKED IN’ section under the ‘Timesheet’ tab to give everyone a lunch break.
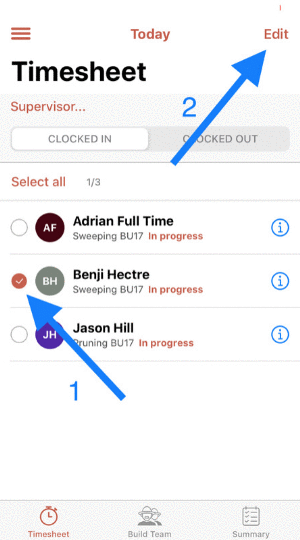
Step 1: Click on ‘Select all’ found above the names, to the left.
Step 2: Click on ‘Edit’ on the top right corner of your screen.
Step 3: Select ‘Lunch Break’, and assign the duration. Once done, select UPDATE LUNCH BREAK’ at the bottom of the screen.
You have now successfully assigned a lunch break to your staff.

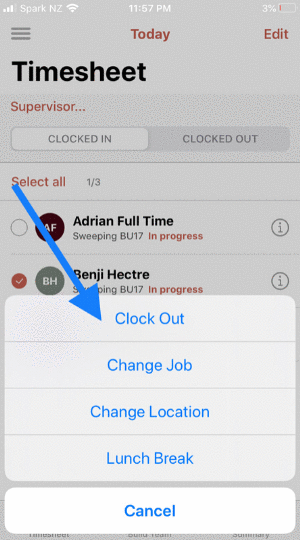
How to either Clock out, Change job, or Change location
Step 1: Navigate back to the ‘CLOCKED IN’ section under the ‘Timesheet’ tab
Step 2: Select the picker(s).
Step 3: Click on the ‘Edit’ button at the top right corner of your screen
To Clock Out
Step 1: Click on ‘Clock Out’
Step 2: Assign a clock out time
Step 3: Click on ‘CLOCK OUT’ at the bottom of the screen
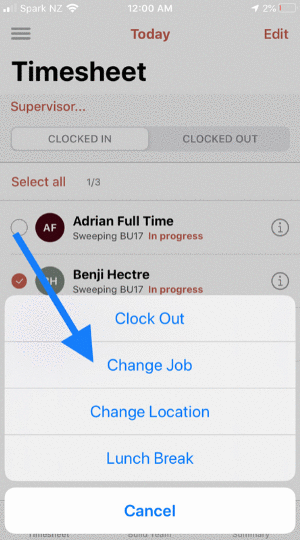
To Change Job
Step 1: Click on ‘Change Job’
Step 2: Select a job. Say, Sweeping (this is just an example)
Step 3: Assign a location for the picker(s) to sweep
Step 4: Assign a time and click on ‘CLOCK IN’ at the bottom of the screen
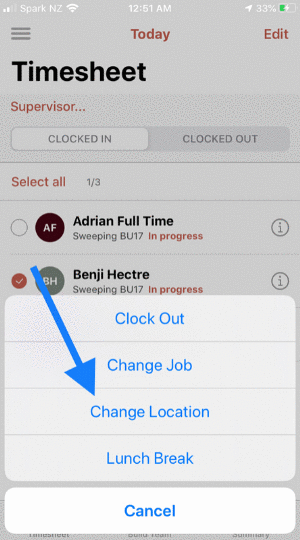
To Change Location
Step 1: Click on ‘Change location’
Step 2: Select the Orchard, Block, and Row.
Step 3: Click on ‘SELECT TIME’ at the bottom of the screen
Step 4: Assign a start time and click on ‘CLOCK IN’ at the bottom of the screen.
Want to know more?
Contact us to find out how we can help transform your orchard.